Trading Strategies · Lesson 7/57 · 8 min read
PO3 and Confirm DOL: A Practical Checklist Framework
In this article
- This Lesson Builds Directly on the Previous One
- Pillar 1, Deeper: Judging the "Quality" of Liquidity
- Pillar 2, Deeper: The Three Life States of an FVG
- Pillar 3, Deeper: PO3 (Power of Three) and Confirm DOL
- Pillar 4, Deeper: Deep Premium/Discount and the Exact Time Window
- DOL Priority: How to Set Your Target
- Putting the Whole Flow Together
- Summary
This Lesson Builds Directly on the Previous One
In the previous lesson ("ICT Smart Money Concepts Basics"), you learned liquidity sweeps, FVGs, and higher-timeframe bias. This lesson takes those concepts and turns them into a concrete checklist model that answers "exactly when, and under what fully-met conditions, do I actually click the entry button?" We'll go much deeper into each of the four pillars that traders teaching this approach consistently emphasize.
| Pillar | What you learned before | What's added in this lesson |
|---|---|---|
| 1. Liquidity | What a liquidity sweep is | How to distinguish liquidity "quality" (Low vs. High Resistance) |
| 2. Imbalance (FVG) | What an FVG is | The 3 "life states" of an FVG (respected / invalidated / inverted) |
| 3. Confirm DOL | HTF direction + target (DOL) | The PO3 cycle and the HTF 4-step condition |
| 4. Time + Price | What a killzone is | Deep premium/discount, and the exact time window |
⚠️ The same caveat from the previous lesson applies here too. The model below is a synthesis of the specific execution approach taught by certain YouTube traders, and it hasn't been academically validated. The goal of this lesson is to explain precisely how such a framework exists and works — not to claim that trading this way guarantees profit.
Pillar 1, Deeper: Judging the "Quality" of Liquidity
In the previous lesson, a liquidity sweep was "a move that briefly pokes through a recent high or low and reverses." In practice, not every recent high or low carries equal weight. Traders split them into two categories.
- Low Resistance Liquidity (LRL): A high or low formed cleanly, without much of a fight — few overlapping wicks, a smooth move to that level. If price returns to this level, it's considered likely to punch through "easily," without much resistance.
- High Resistance Liquidity (HRL): A high or low where price whipped back and forth several times nearby (multiple overlapping wicks), showing a real tug-of-war between buyers and sellers. Because real buying and selling pressure collided there, price returning to this level is considered more likely to get "rejected" and reverse.
This distinction matters because when setting a target (DOL), a low-resistance zone gets treated as "just a waypoint price passes through," while a high-resistance zone gets treated as "an actual destination — or a real obstacle." Setting your target at low-resistance liquidity carries a relatively higher risk of the move losing steam and reversing before it ever gets there.
Pillar 2, Deeper: The Three Life States of an FVG
Once an FVG forms, it settles into one of three states over time.
- Respected: Price enters the FVG zone, doesn't fully fill it, and bounces back in the original direction. This FVG continues to be treated as a "still-valid" support/resistance zone.
- Invalidated: Price fully trades through the FVG zone. This FVG is considered to no longer function as support/resistance in that direction.
- Inversion: Interestingly, an invalidated FVG can come back to life as support/resistance in the opposite direction. A bullish FVG that used to act as support, once price fully trades below it, gets reinterpreted as resistance pressing down from above — exactly the same "broken resistance becomes support" logic from Lesson 4, just applied to FVGs.
💡 The key point is that finding an FVG once doesn't mean it stays valid forever. You always need to re-check whether a given FVG is currently respected, invalidated, or inverted.
Pillar 3, Deeper: PO3 (Power of Three) and Confirm DOL
PO3: The Market's Three-Phase Rhythm
PO3 refers to a three-phase rhythm that price repeatedly shows within a single session (or a single swing).
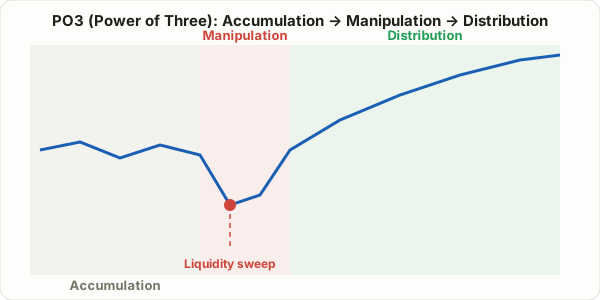
- Accumulation: Price consolidates within a tight range. There's no strong directional bias yet, and it's hard to tell which way it'll break at this stage.
- Manipulation: A move that briefly pokes through the high or low of the accumulation range — this is the liquidity sweep you just learned about. It's interpreted as a brief fakeout in the opposite direction from where price is really headed.
- Distribution: The genuine, strong move in the real direction that follows the manipulation phase. This is the phase where the actual profit opportunity lies.
Confirm DOL: The HTF 4-Step Condition
PO3 alone doesn't tell you, in real time, whether you're still in the manipulation phase or already at the start of distribution. So traders use a checklist of four conditions on a higher timeframe (HTF) that all have to confirm, in order, before a signal is treated as real.
- A liquidity sweep at an HTF swing point: Was a meaningful recent high or low swept on the 15-minute chart or higher?
- Displacement: Right after the sweep, did price move quickly with a clearly strong directional candle (a long bullish or bearish candle)? Without this, it's more likely just noise.
- FVG formation: Did that displacement candle leave behind an FVG? No FVG suggests the move lacked the conviction needed to trust it.
- No invalidation: Has price stayed away from re-crossing back past the sweep point (the extreme of the manipulation phase) in the opposite direction? If this breaks, the signal itself is invalidated.
Once all four conditions confirm, direction is considered "confirmed" — and only then do you drop to a lower timeframe (LTF, e.g. the 5-minute chart) and wait for the same pattern (sweep + FVG) to show up again, in miniature, before actually entering. That final step is where the name "Confirm DOL" comes from — the direction toward a pool of liquidity (the DOL) gets confirmed on both the higher and lower timeframe.
Pillar 4, Deeper: Deep Premium/Discount and the Exact Time Window
Premium, Discount, and Going "Deep"
In the previous lesson, you learned to reference whether the current price sits above (premium) or below (discount) the day's open. Taking this one step further: instead of just "above or below the open," traders look at the most recent swing's high-to-low range as 100%, and measure how far price has moved past the halfway point (50%, or equilibrium) of that range.
- Barely past the halfway point is considered a "shallow" premium/discount, and treated as lower-confidence.
- Moving deep toward the extreme (the high or the low) of that range is called a "deep" premium or discount, and signals originating from deep discount (for longs) or deep premium (for shorts) are treated as higher-confidence.
In other words, this takes the classic "buy low, sell high" idea and makes it quantitative: how extreme is "low" or "high," specifically within the most recent swing range.
The Exact Time Window: Killzones
This framework doesn't treat every hour of the day equally — it only considers signals during specific windows believed to see concentrated institutional order flow (killzones). The most widely used is the morning killzone right after the New York regular session opens.
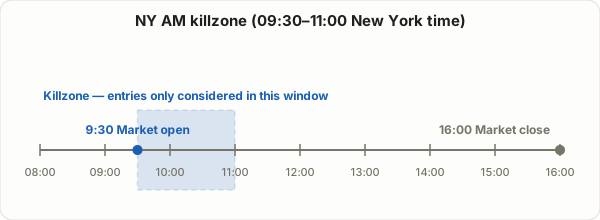
💡 Why this specific window? The premise is that a disproportionate amount of the large, direction-setting orders for the day arrive right as the regular session opens. Keep in mind this isn't a validated law — it's an empirical rule of thumb based on observation.
DOL Priority: How to Set Your Target
Once Confirm DOL has established direction, your target (DOL) isn't picked arbitrarily — you work down a priority list, aiming for the nearest liquidity pool that's still meaningful.
| Priority | Target candidate | Description |
|---|---|---|
| 1st | Today's session high/low | The nearest liquidity that has already formed intraday, today |
| 2nd | Prior day's high/low (PDH/PDL) | Next candidate if the 1st priority has already been taken out or is too close |
| 3rd | Prior week's high/low (PWH/PWL) | A target for longer-horizon swing trades |
Ranking targets this way means "where should today's target be for this stock" gets answered by a consistent rule every time, rather than a gut call.
Putting the Whole Flow Together
Here's everything from this lesson laid out as an actual checklist, in order.
- [Time] Is it currently within the killzone window?
- [HTF direction] On the higher timeframe, have all four steps confirmed: liquidity sweep → displacement → FVG formation → no invalidation?
- [Target] Has a target been set in that direction using the DOL priority list? Is the target meaningful (high-resistance) liquidity rather than low-resistance?
- [Price] Is the entry zone sitting in deep premium/discount territory?
- [LTF confirmation] Has the same sweep + FVG pattern shown up once more, in miniature, on a lower timeframe?
Only when all five are "yes" is an entry considered. If even one is missing, the signal is treated as lower confidence and skipped.
Summary
- Not all liquidity is equal — distinguish between Low Resistance (punches through easily) and High Resistance (reacts strongly).
- An FVG cycles through three states — respected, invalidated, or inverted — so finding one isn't the end of the analysis; you have to keep re-checking its current state.
- PO3 (Accumulation → Manipulation → Distribution) is the market's recurring three-phase rhythm, and the HTF 4-step condition in Confirm DOL is the checklist for telling apart a manipulation-phase fakeout from the real start of distribution.
- Deep premium/discount and the killzone time window serve as the final time-and-price filters.
- A target (DOL) is set using the today's session → prior day → prior week priority list, not gut feel.
Whichever strategy you use, what matters most in the end is being able to clearly explain to yourself why you trust a given signal — and having actually verified that against real data. Starting with the next lesson, we dissect eight concrete strategies one by one to see exactly how the concepts covered so far show up inside a real trading system.