Trading Strategies · Lesson 65/65 · 10 min read
Supertrend Indicator Strategy: Using ATR Multiples to Trade Trend Direction and Trail Your Stop
In this article
- One Line That Tells You Both Direction and Where to Put Your Stop
- How the Calculation Actually Works
- Period and Multiplier: The Only Two Dials You Have
- Trading Rules: Long/Short Stop-and-Reverse
- Where Supertrend Shines vs. Where It Gets Dangerous
- Supertrend vs. Chandelier Exit: Same ATR Trail, Different Anchor
- Limitations Worth Knowing
- FAQ
- Summary
One Line That Tells You Both Direction and Where to Put Your Stop
Every trader eventually wants the same thing from a single overlay: tell me which way the trend is pointing, and tell me where my stop should sit. A moving average shows direction but reacts too slowly to double as a stop. An ATR-based stop tells you where to exit but says nothing about direction. That gap is exactly why the Supertrend indicator has become one of the most-added overlays on TradingView over the past few years. It draws a single line above or below price that does two jobs at once: its color marks the current trend, and its position acts as a trailing stop that ratchets in your favor.
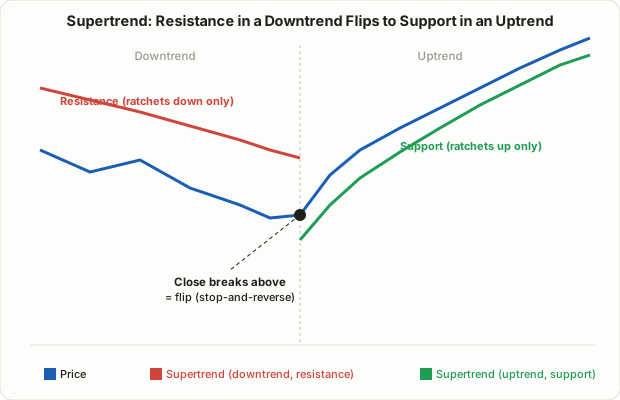
The underlying idea isn't new. Like the ATR-based stop covered in the risk filters lesson, Supertrend builds bands above and below price using Average True Range (ATR). What makes it distinct is a ratchet rule: while a trend holds, the relevant band can only tighten toward price, never loosen away from it — and the moment a candle closes through the opposite side, the whole line flips, a mechanic often called "stop-and-reverse." Conceptually it sits in the same family as Wilder's own Parabolic SAR and the Chandelier Exit, but its simple two-input setup and clean visual read made it especially popular first among Indian Nifty and Bank Nifty day traders, then spread widely into crypto and global equity trading communities.
How the Calculation Actually Works
The core of Supertrend is a rule that the band can never retreat against the trend. It's built in three steps.
- Basic bands: take the midpoint of the day's high and low ((high + low) ÷ 2), then add and subtract (ATR × multiplier) to get a Basic Upper Band and a Basic Lower Band.
- Ratcheting into final bands: the Final Upper Band only updates to a new (lower) value if the new Basic Upper Band is lower than yesterday's Final Upper Band, or if yesterday's close had already broken above it — otherwise it just holds its prior value. The Final Lower Band works the same way in reverse: it only rises, or holds. This one rule is what keeps a downtrend's resistance line sliding only downward and an uptrend's support line sliding only upward, exactly like a trailing stop that's only allowed to move in your favor.
- The flip: while the current Supertrend line is the Final Upper Band (a downtrend), a close above that line immediately flips the whole line to the Final Lower Band, and its color switches. The same happens in reverse when price closes below the Final Lower Band during an uptrend.
The practical effect: for as long as a trend holds, the line only creeps closer to price — and the instant price closes through it, the entire structure jumps to the other side. That one-way ratchet is what separates Supertrend from a plain moving-average band.
A Numeric Walkthrough
Assume a multiplier of 3, a 10-period ATR reading of $8.00, and a stock currently in an uptrend (the lower band acting as support).
- Day 1: (high + low) ÷ 2 = $521.00. Basic lower band = $521.00 − (3 × $8.00) = $497.00. Since this is higher than the prior day's confirmed lower band, it's accepted as the new Supertrend line.
- Day 2: price grinds higher, (high + low) ÷ 2 = $529.00. Basic lower band = $529.00 − $24.00 = $505.00. This is higher than yesterday's $497.00, so the line ratchets up from $497.00 to $505.00.
- Day 3: the close comes in below $505.00, at $501.00. Because the close broke the lower band, the trend flips. The Supertrend line jumps immediately to the upper band value and switches color from green to red.
Notice that while price was climbing, the support line only ever moved from $497.00 up to $505.00 — it never retreated lower, even on a normal pullback candle — until the close finally broke it, at which point the whole structure reversed at once. That asymmetry is exactly what lets Supertrend double as both a direction indicator and a trailing stop.
Period and Multiplier: The Only Two Dials You Have
Supertrend has just two settings to tune — the ATR period (commonly 10) and the multiplier (commonly 3) — and between them, they define the entire personality of the strategy.
| Settings | Behavior | Best Suited For |
|---|---|---|
| Short period + low multiplier (e.g. 7, 2) | Band hugs price tightly; fast signals, but frequent flips (whipsaw) | Scalping, fast in-and-out trading |
| Default (10, 3) | The most widely cited combination; the out-of-the-box default on most platforms | Day trading to short-swing trading |
| Long period + high multiplier (e.g. 14, 4) | Band sits far from price; slower but more stable signals | Swing and position trading |
The (10, 3) combination gets cited constantly, but it's a convention that's become standard practice more than a value with any universal proof behind it. On volatile small caps or crypto, the default settings often produce far more flips than are tradeable, and widening the multiplier to somewhere around 3.5–4 is a common adjustment traders make in response.
Trading Rules: Long/Short Stop-and-Reverse
The base version of a Supertrend strategy is close to mechanical.
- Entry: go long on the candle where the line flips green (lower band); go short or exit on the candle where it flips red (upper band).
- Stop-loss: the current Supertrend value is your stop the moment you enter. Because the line only ever moves in your favor while the trend holds, the trailing stop updates itself with no manual adjustment needed.
- Exit or reversal: traders commonly split into two camps here — always-in-the-market systems that flip straight from long to short (and vice versa) on every color change, versus systems that simply exit on a flip and wait for a separate confirmation (a pullback, a volume spike) before re-entering. The latter is generally considered less exposed to whipsaw losses.
- Pair it with a regime filter: Supertrend gives you direction and a stop, but it has no built-in way to tell you whether the current market is even worth trend-trading. Pairing it with a strength filter like the ADX 25 threshold from the ADX/DMI lesson — ignoring or downsizing flip signals when ADX is low — is a common practical adjustment.
Where Supertrend Shines vs. Where It Gets Dangerous
Because Supertrend is, at its core, a trend-following tool, its results diverge sharply depending on market regime.
| Trending Market | Range-Bound Market | |
|---|---|---|
| Supertrend's behavior | Holds one color for long stretches with no flips; the trailing stop locks in profit as the trend extends | Flips back and forth between green and red every few bars, usually right around the entry/stop level |
| Outcome | Strong at capturing and staying with large, sustained moves | Every flip burns spread, commission, and slippage — the pattern often nicknamed "death by a thousand whipsaws" |
| Complementary tool | Confirm with ADX/DMI for strength | Consider a mean-reversion approach instead |
In short, Supertrend has no built-in way to recognize that it's in a choppy market. Applied mechanically across every regime with no separate filter, it tends to bleed out through repeated stop-outs whenever price is range-bound.
Supertrend vs. Chandelier Exit: Same ATR Trail, Different Anchor
The indicator most often compared to Supertrend is the Chandelier Exit. Both share the same core idea — a trailing stop set some ATR multiple away from price — but they anchor that distance to different reference points.
| Supertrend | Chandelier Exit | |
|---|---|---|
| Anchor point | Each day's (high + low) ÷ 2 midpoint | The highest high (for longs) or lowest low (for shorts) over a recent lookback window |
| Character | Reacts to each bar's average price, so it tends to stay relatively tight | Anchors to a recent extreme, so once a new high forms, the stop trails at a fixed ATR distance from that specific high |
| Whipsaw vs. stability | Tighter bands mean faster reactions but somewhat more frequent flips | Because it's anchored to an extreme, it can be a bit slower to react to a sharp reversal, but tends to be steadier once established |
| Signal type | Flips color on every reversal, giving a clear built-in stop-and-reverse entry/exit signal | Typically supplies only the exit/stop level; a separate entry trigger is usually needed |
| Best fit | Traders who want entries, exits, and a stop from a single line | Traders who already have an entry signal and just need to decide when to get out |
Neither is objectively superior. Traders who want to react quickly to shifting conditions tend to favor Supertrend, while those who prefer a slightly more conservative trail anchored to actual swing highs/lows often lean toward the Chandelier Exit. It's also common to see both plotted together, with signals only trusted when the two agree on direction.
Limitations Worth Knowing
- It's a lagging indicator. Like ADX from the trend strength lesson, Supertrend is built on ATR and only confirms direction after a trend has already gotten some distance underway — it isn't built to call exact tops or bottoms.
- Choppy markets produce repeated losses. As the regime table above shows, range-bound conditions tend to generate flip after flip, each one a small loss. Pairing it with a regime filter is standard practice rather than optional.
- Multiplier selection carries curve-fitting risk. A multiplier that looks great on historical data can stop working once volatility conditions shift.
- Vulnerable to gaps. An overnight gap that jumps clean through the Supertrend line means the actual fill can land well past the calculated stop level.
- One setting rarely fits everything. A 24-hour, high-volatility asset like crypto and a slow-moving large-cap stock can behave very differently under the same (10, 3) settings.
FAQ
Is the (10, 3) Supertrend setting always the right choice?
No. It's the most widely cited default, but there's no evidence it's optimal across every symbol and timeframe. If an asset is highly volatile or flipping too often, widening the multiplier to reduce flip frequency is a commonly suggested adjustment.
Can I trade using Supertrend alone?
That's generally not recommended. Supertrend is strong in trending conditions but has no built-in way to recognize a range-bound market. Pairing it with a regime filter such as ADX, or confirming with volume or price structure, is standard practice.
How is Supertrend different from a moving average?
A moving average is a simple or exponential average of past prices, so it turns slowly and reacts too late to double as a stop-loss. Supertrend's ATR-based bands ratchet in only one direction and flip entirely the moment price closes through them, which is what lets it function as a self-adjusting trailing stop in addition to a direction signal — that ratcheting mechanic is the key difference.
Summary
- Supertrend draws bands at ATR × multiplier above and below price, lets the relevant band tighten only in the trend's favor, and flips the entire line the moment a close breaks the opposite band — a mechanic known as stop-and-reverse.
- It has exactly two inputs, ATR period and multiplier, with (10, 3) as the most common default — though not a universal optimum.
- Because the line itself doubles as a self-trailing stop, it lets a trader manage entry, exit, and stop-loss off a single overlay.
- It performs strongly in trending markets but tends to whipsaw in range-bound ones, so pairing it with a regime filter like ADX/DMI is standard practice.
- Compared to the similarly ATR-based Chandelier Exit, Supertrend anchors to the daily midpoint (faster, more flips) while the Chandelier Exit anchors to recent swing extremes (steadier, slower); which one fits depends on whether you want a single all-in-one signal or just a trailing exit for a separate entry system.