Trading Strategies · Lesson 39/57 · 9 min read
ICT Order Blocks Explained: Finding Bullish and Bearish Order Blocks, Plus Breaker Blocks
In this article
What an Order Block Actually Is
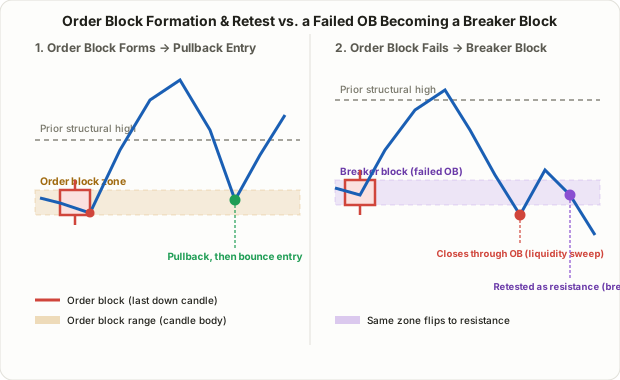
Lesson 5's ICT Smart Money Concepts introduced liquidity and the Fair Value Gap. This lesson covers the concept that comes up just as often in ICT and smart-money circles: the order block (OB). The definition itself is simple — an order block is the last candle in the opposite direction before a sharp, one-directional move (an impulse) begins. That means the last down candle right before price rips higher, or the last up candle right before price collapses lower.
Why would that specific candle matter? The ICT reasoning goes like this: a large institutional participant can't fill an order of meaningful size at a single price without moving the market against themselves. So instead of pushing directly in their intended direction, the theory holds that they first push price the opposite way for a candle or two, filling orders gradually as they go, and only once enough size is on their book do they let price rip in the direction they actually wanted. If you accept that framing, it follows that the zone marked by that last opposing candle likely still holds unfilled orders — and that when price later swings back through that same zone, the same participants (plus new ones who missed the original move) are inclined to add there again.
⚠️ As with Lesson 5, this narrative about how institutions place orders is not something you can verify from public data — it's an interpretive framework, not an audited fact. Order blocks are not a formally validated concept in academic finance; treat what follows as one widely-used way of reading price structure, and backtest it yourself before trusting it with real money.
Bullish vs. Bearish Order Blocks
Order blocks split into two mirror-image types depending on which direction the impulse ran.
| Bullish OB | Bearish OB | |
|---|---|---|
| Forms as | The last down candle before a strong upward impulse | The last up candle before a strong downward impulse |
| Interpretation | Buy-side orders left unfilled in that zone | Sell-side (short) orders left unfilled in that zone |
| Expected reaction on retest | Acts as support → bounce | Acts as resistance → rejection |
| Commonly paired with | A bullish FVG, often after a liquidity sweep | A bearish FVG, often after a liquidity sweep |
The candle's color isn't really the point — what matters is what happened right after it. A down candle followed by nothing in particular isn't an order block. It only qualifies once it's followed by a genuine break of structure (BOS) — price decisively clearing the prior swing high or low.
A Step-by-Step Process for Identifying One
In practice, picking out "the" order block on a live chart is where most of the confusion happens. This sequence cuts down the guesswork:
- Find the impulse first. Look for a stretch where several candles push almost without pause in one direction and clearly break a prior swing high or low. The stronger that push, and the more it leaves behind a Fair Value Gap (covered in Lesson 8's IFVG + PO3 breakdown), the more weight traders tend to give it.
- Identify the last opposing candle right before that impulse. For a bullish impulse, that's the final down candle; for a bearish impulse, the final up candle.
- Define the zone's boundaries. The conservative approach uses just the candle's body (open to close); a looser approach uses the full high-to-low range including wicks. Neither is universally "correct" — different traders and different educators draw it differently, so pick one convention and apply it consistently.
- Watch for price to return to that zone. Once the impulse plays out, a retrace back into the order block zone is what actually puts the setup in play.
Entry, Stop, and Target: Commonly Used Conventions
An order block only flags a zone worth watching — it doesn't hand you a precise entry price on its own. Traders commonly lean on the following conventions, and none of these are hard rules, just widely repeated rules of thumb:
- Entry: rather than buying or selling the instant price touches the zone, many traders wait either for price to reach the 50% level of the zone (sometimes called "equilibrium") or for a lower-timeframe confirmation signal — for example, a small liquidity sweep inside the zone followed by a reversal candle. This mirrors the same top-down structure Lesson 7's PO3 and Confirm DOL uses: mark a zone of interest on a higher timeframe, then confirm the actual entry on a lower one.
- Stop-loss: placed just beyond the zone's extreme — below the candle's low for a bullish OB, above the candle's high for a bearish OB. The logic is that if the order block is genuinely valid, price shouldn't need to trade back through that extreme.
- Target: usually the next pool of resting liquidity — a prior swing high/low, or a higher-timeframe draw on liquidity (DOL).
- Confluence: many traders assign more weight to an order block when a Fair Value Gap sits inside it (often called an "OB+FVG combo"), or when the zone happens to line up with a previously established support/resistance level.
Order Block vs. Breaker Block: When a Failed OB Flips
Order blocks don't always hold. When price enters an order block zone and, instead of bouncing, closes cleanly through it, that order block is considered to have failed. When a failed order block later gets retested and acts as support/resistance in the opposite direction from its original role, that flipped zone is called a breaker block.
| Order Block (holding) | Breaker Block (failed & flipped) | |
|---|---|---|
| Precondition | Last opposing candle before an impulse | An order block that has already closed through |
| Required at failure | N/A | A liquidity sweep on the opposite side right before the close-through |
| Role on next visit | Same direction as original (support stays support, resistance stays resistance) | Reversed (a former support zone becomes resistance, or vice versa) |
| Practical read | "The trend is likely to continue from here" | "Structure has shifted — consider the opposite side" |
One practical test separates the two: did price merely wick through the zone, or did the candle actually close outside it? A brief wick poke that closes back inside usually leaves the order block intact. A clean close outside the range is typically treated as a failure, which sets up the breaker block scenario. One added wrinkle worth knowing: if the failure also swept liquidity on the opposite side (say, taking out a prior low right before the close-through), that's usually what earns the "breaker block" label specifically; a close-through without that opposite-side liquidity sweep is sometimes classified separately as a "mitigation block" instead. The exact terminology varies by trader and by course — what matters more than the label is watching how price actually behaves on the retest.
Why a Broken Order Block Flips Direction
The mechanical story behind a breaker block acting as reversed support/resistance runs like this: traders who bought or sold inside the original order block are now underwater once price closes cleanly through it. When price swings back to retest that same zone, a meaningful share of those trapped participants are inclined to get out near breakeven — meaning they now sell into a bounce (if they were originally long) or buy back into a dip (if they were originally short). Stack that behavior on top of whatever unfilled orders were still sitting in that zone to begin with, and the level ends up attracting pressure in the opposite direction from its original role. This is the same underlying mechanism as the stop-loss cascades covered in Lesson 6 — the price level itself doesn't have any inherent power; the behavior of the people trapped at that level is what actually moves the market.
FAQ
How is an order block different from plain support and resistance?
Lesson 4's support/resistance looks backward at levels price has already reacted to multiple times. An order block adds an extra requirement on top of that: was there a genuine impulse move right after this specific candle? Every order block is a candidate support/resistance zone, but not every support/resistance zone qualifies as an order block.
Do older order blocks stay valid indefinitely?
The general view is no — the more time passes, and the more impulses and liquidity events happen in between, the less reliable an order block becomes. Many traders also treat a zone as "used up" once it has already produced one clean reaction, and give it less weight on a second visit.
Is it safe to trade order blocks alone, with nothing else?
Not recommended. An order block flags a zone worth paying attention to — it isn't a complete trading signal by itself. As covered in Lesson 13's ATR Stops, Net-Edge Filters, and CMF Confirmation, you still need a defined stop-loss and a separate confirmation signal before acting on it.
Limitations and Caveats
- Subjectivity: there's no universal standard for which candle counts as the order block, or whether to measure the zone by body or by full range, so two traders can mark completely different zones on the same chart.
- Hindsight bias: it's easy to point at a chart after the fact and say "that was the order block" — judging in real time how strong an impulse needs to be before it qualifies is a much harder problem.
- Crowding risk: because ICT-style concepts have become so widely followed, retail orders often cluster around the same obvious order block zones, which can make those exact levels an attractive target for larger participants to sweep rather than respect.
- Unverified premise: as noted above, there's no way to publicly confirm that institutions actually trade this way. Backtest the concept against your own historical data before relying on it in live trading.
Summary
- An order block is the last opposing candle right before a strong impulse move — a zone expected to act as support or resistance when price retraces back into it.
- A bullish order block is the last down candle before an upward impulse; a bearish order block is the last up candle before a downward impulse.
- Identify one in order: find the impulse → locate the last opposing candle → define the zone (body or full range) → wait for a retracement into it.
- Common practice is to confirm entries at the zone's 50% level or with a lower-timeframe signal rather than entering immediately, place stops beyond the zone's extreme, and target the next pool of liquidity.
- When an order block closes through completely, it can flip into a breaker block that works in the opposite direction — and whether the opposite side's liquidity got swept in the process is the practical test that separates a breaker block from a mitigation block.
- This is an unverified interpretive framework with real subjectivity and hindsight-bias risk — always pair it with independent risk management rather than trading it in isolation.